A complete Workplace documentation#
In this use case, we will create a building, assign different rooms to this building and fully document an employee's workplace.
Step-1: Create buildings and rooms#
In order to be able to add devices, contracts, people and other assets to buildings and rooms later, they must be created first. If you do not want to enter buildings and rooms, but want to limit the documentation purely to their devices, you can skip this step or do it at a later time.
The relationships between different objects can be added, resolved, modified or deleted in docupike at any time. This makes docupike the optimal solution for documenting and linking assets.
Create building#
In the left navigation you will find all the classes that you can use to create new objects / devices. In docupike, an object represents an asset. An object can therefore be a building, a notebook or other device, a person or a contract. Depending on the class in which an object is created, different information is requested from the user via the activated categories.
 Building Object: For buildings, e.g. important contacts and current contracts are available as categories.
 Client Object: Contacts and contracts can also be linked in client objects, but the focus here is also on technical information.
Tip
Each class can be fully customized. If you don't need certain categories, you can remove them in the settings. You can also enable needed categories or create a custom categories.
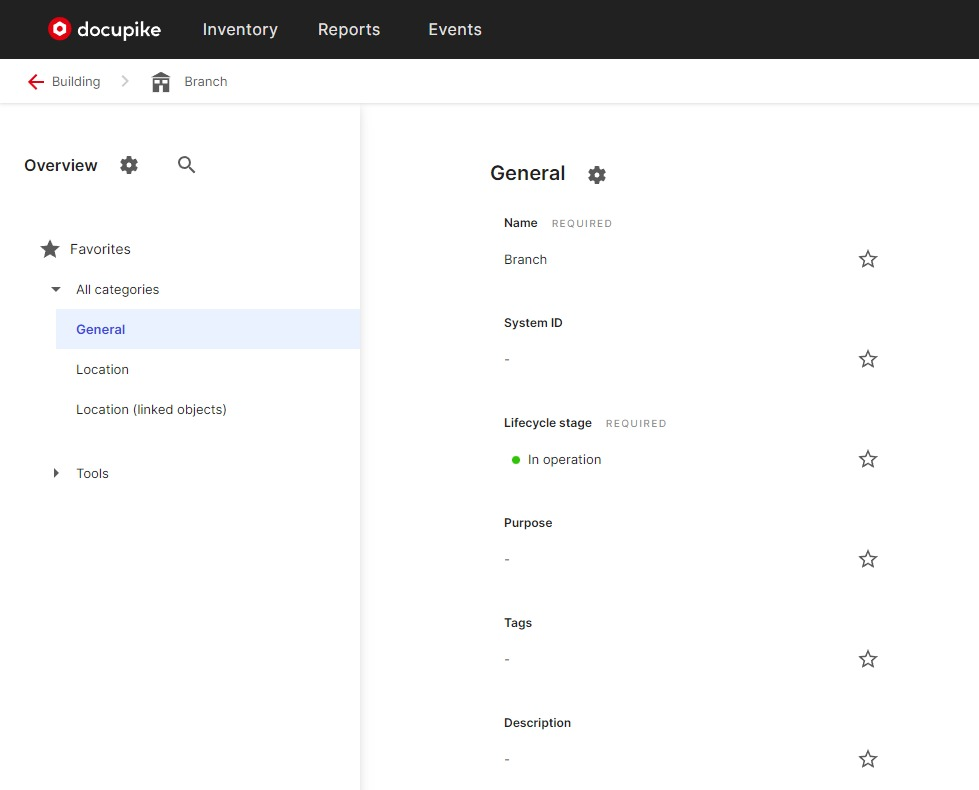
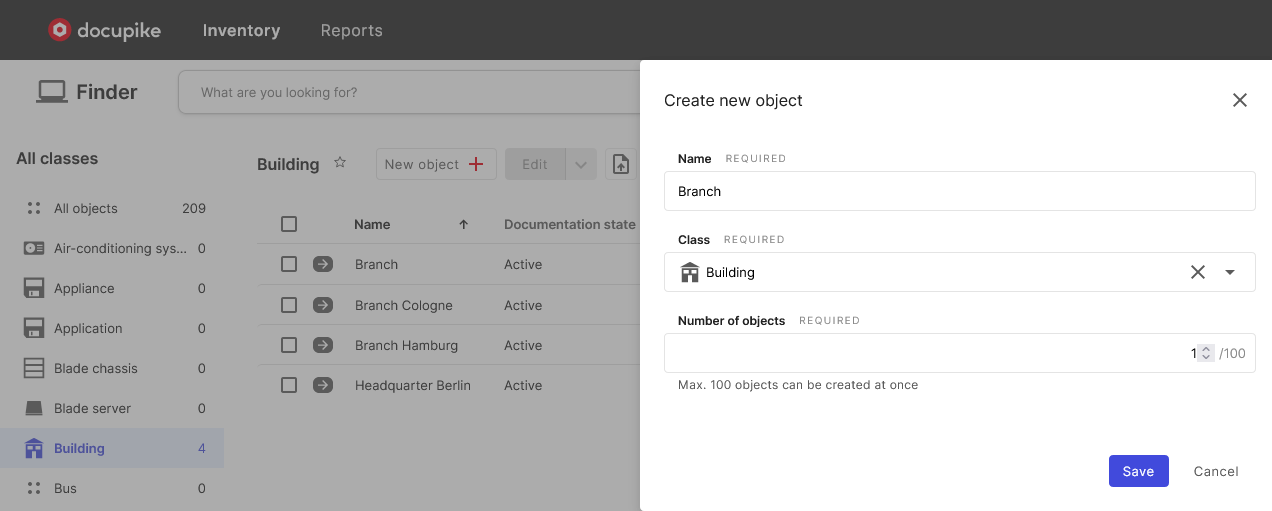
We are now creating a new building called "Branch". In the left navigation, we select the class "Building". Now we click on the button "New object" to create a new building. We assign the name "Branch" and save the object.
 Creating new assets is super quick with docupike
Create and assign rooms#
Next, the rooms of the building are created. For this, you can either create the rooms via the left navigation or import them as a CSV file.
Via the left navigation, we switch to the class "Room".
Here we now create 5 rooms. The number of rooms to be created can be freely varied in the input mask. In this example, we create 5 new rooms with 2 fixed numbers.
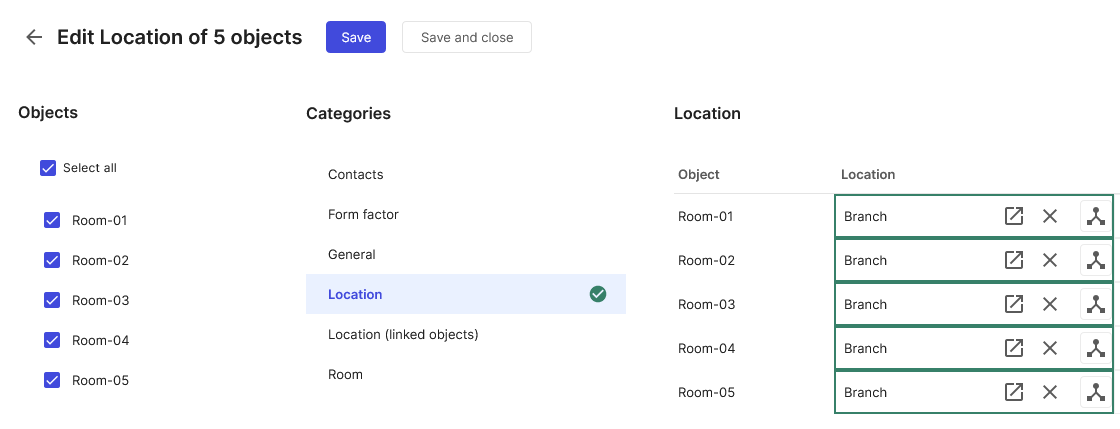
We activate the tick for all 5 rooms and click on the button "Edit".
Here we change to the category "Location" and can adjust the location of all rooms. Here we choose as a location our building that we have created.
The location can be accessed via the "Inventory" button in the upper navigation.

The branch is now displayed with the subordinate rooms in the left navigation.

The creation of the organizational objects is thus completed.
Variant 2: Create rooms via CSV#
To create objects via CSV files, you can use any CSV files. The import is done in the respective class via the import icon. Upload your CSV file and configure in the next step whether your table uses columns headers and which separator is used.

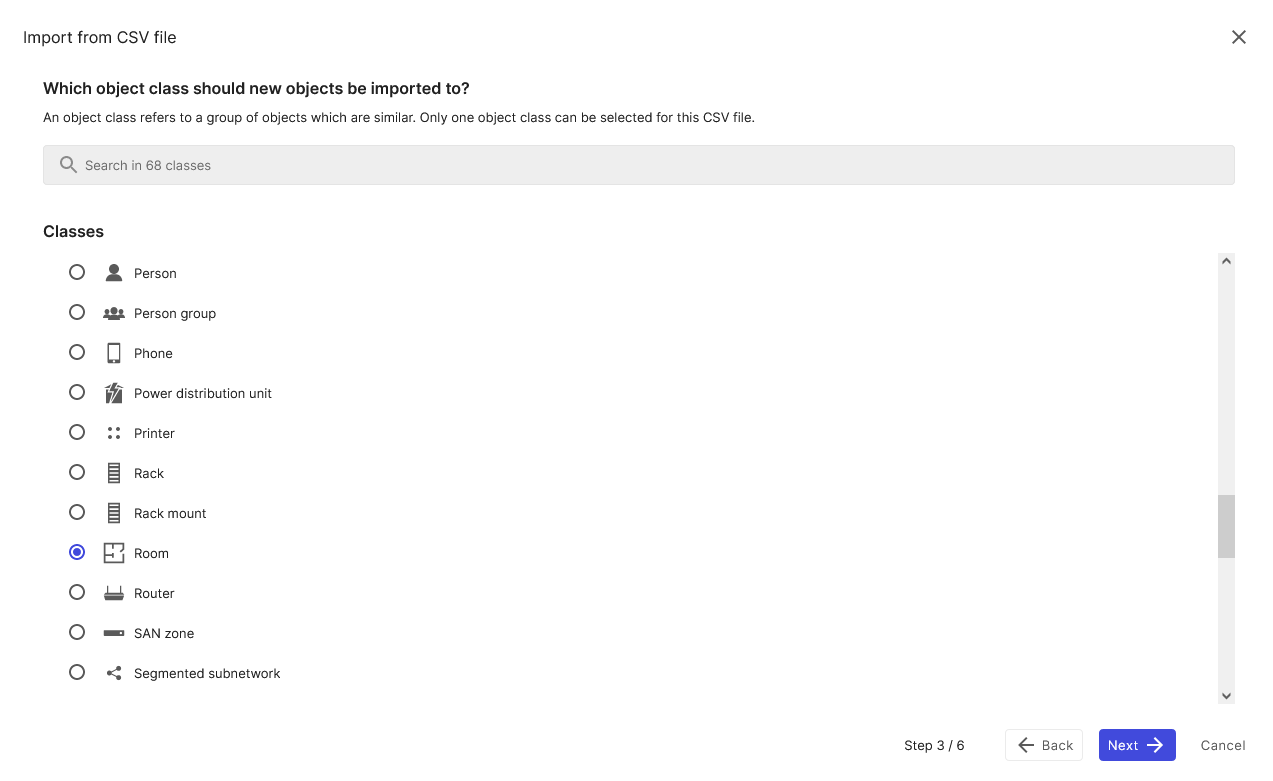
In the next step, select the class in which new objects are to be created.
In the last step, you have to select which column should be used for which attribute. In our example we choose for the first column for the name and the second column for the location.

Since these are new objects, the question "Do you want to update data of already existing objects?" can be left at No. Changes are necessary here if already existing objects are to be updated.
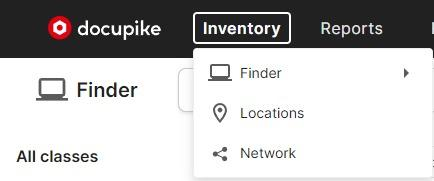
The location can be accessed via the "Inventory" button in the top navigation.
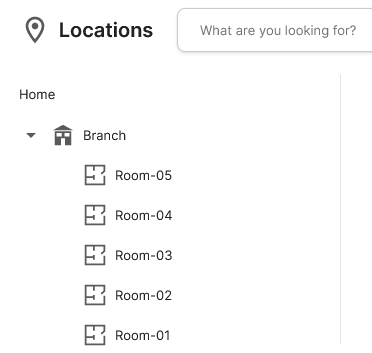
The Branch is now displayed with its child rooms in the left navigation.
Step-2: Create persons#
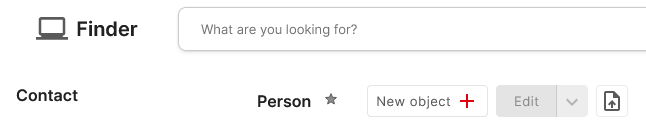
Now it's time to add a few people to our documentation. Like rooms and buildings, these can be created via the "Person" class.
Often, however, you want to create a large number of people initially. Whether as an export from a customer management system, the Active Directory or Excel.
In this example, we will import the following list of people.
| Employee ID | Name | Job Title | Business e-mail | Telephone |
|---|---|---|---|---|
E001 | Ambrose Tretgall | CEO | tretgall@docupike.com | +49211699310 |
E002 | Audrey Blondcrew | CFO | blondcrew@docupike.com | +49211699310 |
E003 | Channing Wheatend | CMO | wheatend@docupike.com | +49211699310 |
E004 | Clarissa Baudstaff | IT Manager | baudstaff@docupike.com | +49211699310 |
E005 | Davin Silvercocke | Sales Accountant | silvercocke@docupike.com | +49211699310 |
E006 | Dorian Glewrodger | Sales Accountant | glewrodger@docupike.com | +49211699310 |
E007 | Ethan Groomstone | Sales Accountant | groomstone@docupike.com | +49211699310 |
E008 | George Smith | Senior IT Engineer | smith@docupike.com | +49211699310 |
E009 | Fabian Prickflour | IT Engineer | prickflour@docupike.com | +49211699310 |
E010 | Fenton Wrightley | Sales Accountant | wrightley@docupike.com | +49211699310 |
Create persons via CSV import#
To do this, we switch to the "Person" class and select the CSV import.
Here we upload our CSV file.
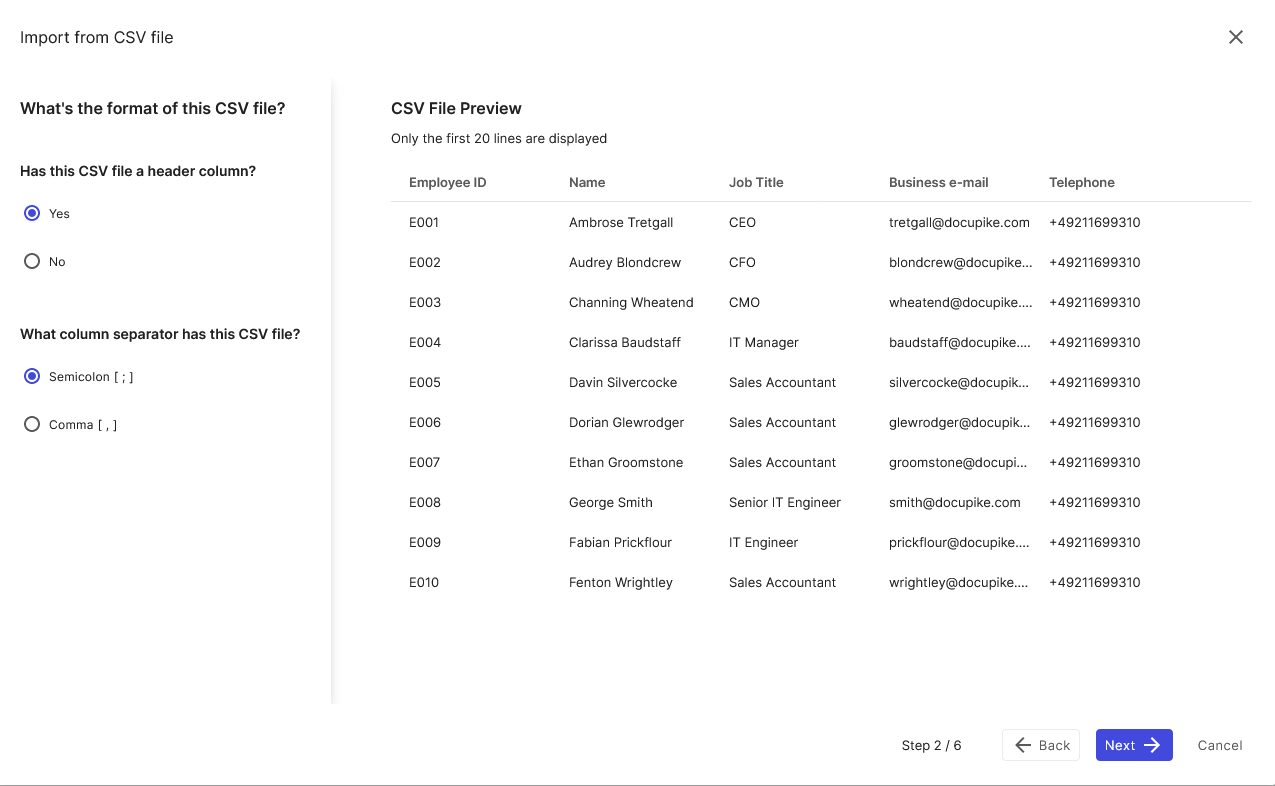
The data should now be displayed in a structured way. If you select an incorrect separator, the data will not be displayed correctly. In this case you should check your CSV file or select another separator.
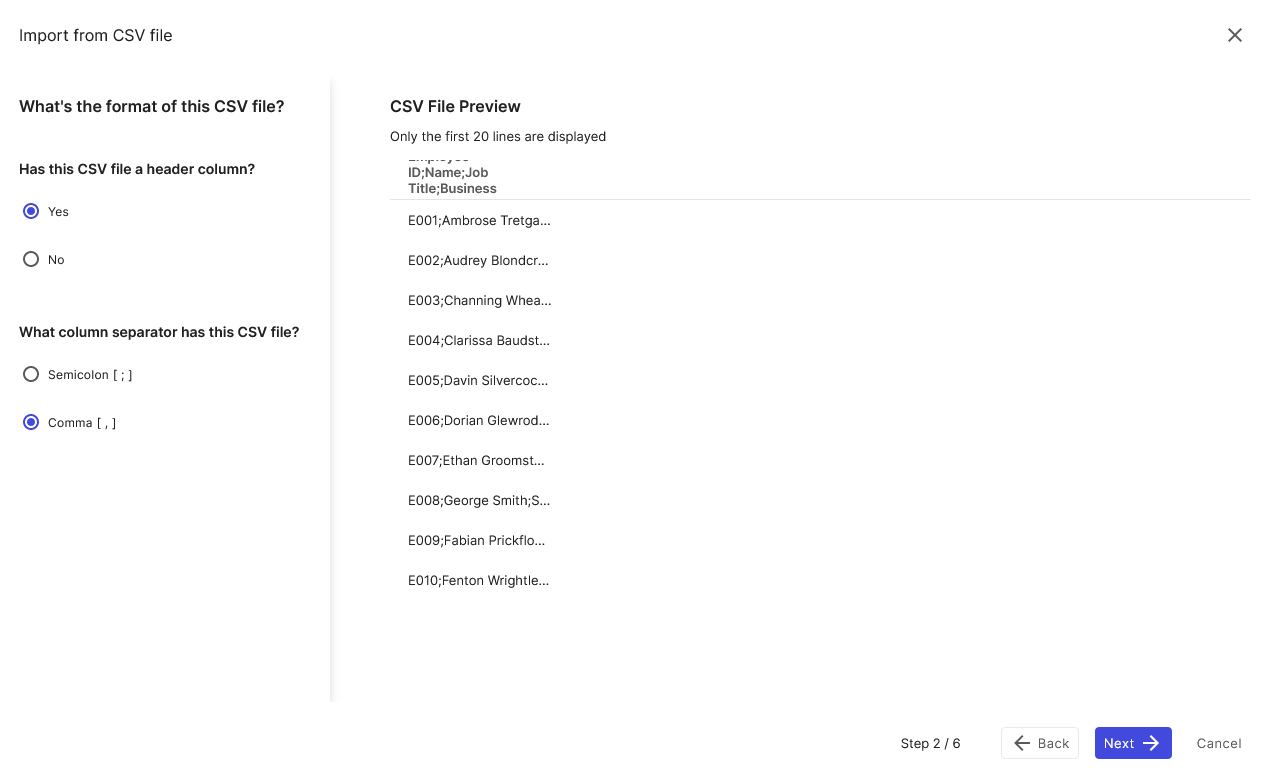
Data-view when you select the wrong separator
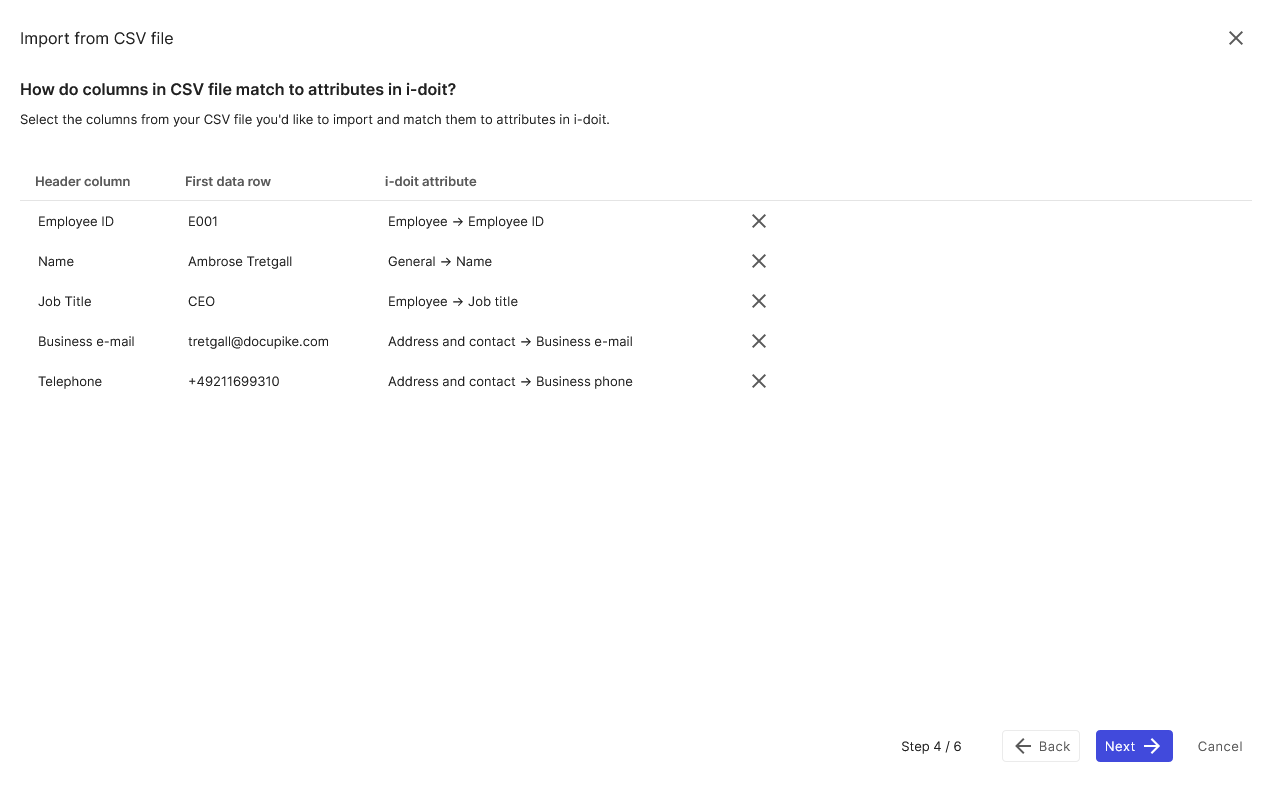
The next step is to map the columns to the data fields. To do this, we now map the values from our CSV file to the category fields in docupike. The result looks like this:
Step-3: Document the Workplace#
A new workstation can now be created via the "Workplace" class. Alternatively, a workstation can also be created directly in the respective room via the Location view. To do this, navigate to one of the created rooms and click on the "New object" button.

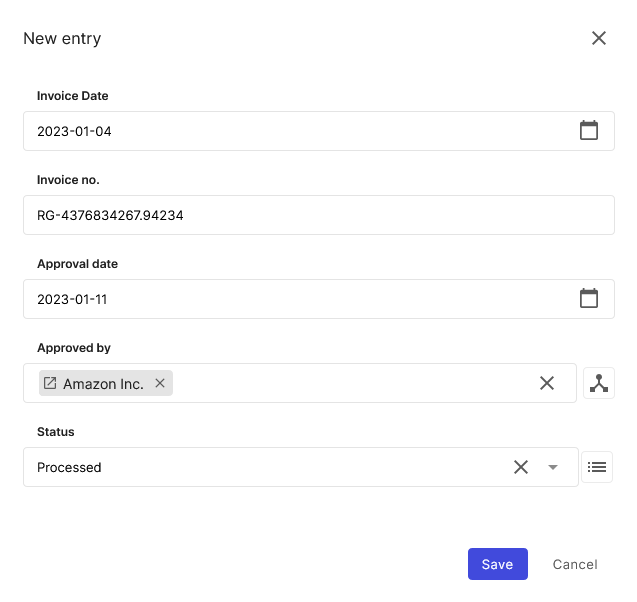
The Workplace is now automatically linked to the room. In the left navigation we now select the category "Contacts". In this category, users, administrators and other important contacts can be entered.
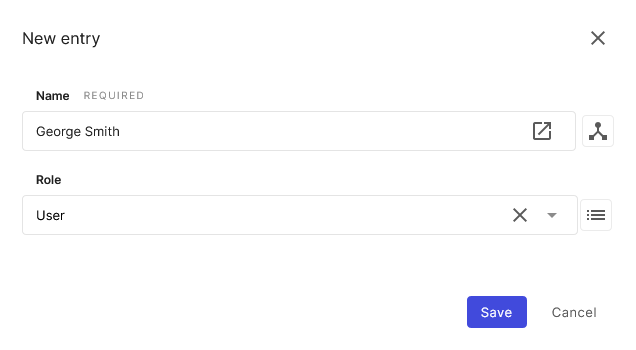
Via the button "New entry" we now link our created user "George Smith" and assign the role "User".
Linked objects#
By linking the workstation with the person "George Smith", an entry for the workstation is now also linked in the person.
If you now open the object "George Smith" in the class "Person", you will see all objects in which George Smith is entered as a contact in the category "Contacts (linked Objects)". Thus one always has a two-sided linkage of information.

If you open the room to which you have assigned the Workplace, you will also find an entry for George Smith's Workplace in the "location (linked objects)" category. Here there is a physical connection, so this relationship is shown in the category "location (linked objects" and not in "contacts(linked objects)".

Create workstation devices#
The creation of the organizational objects is now complete. Now we need to add the devices to the workstation.
We switch to the "Client" class in the left navigation or go back to the Location-view and select the created workstation.

Here we now create a new client via the button "New entry".
The General category contains general information about the object. It is automatically activated in every class. In addition to the name, tags can also be assigned here or an additional description can be inserted.
Customize visible fields
Using the gear icon, the fields to be displayed can be customized in each category. This way the view can be customized and limited to the necessary minimum.
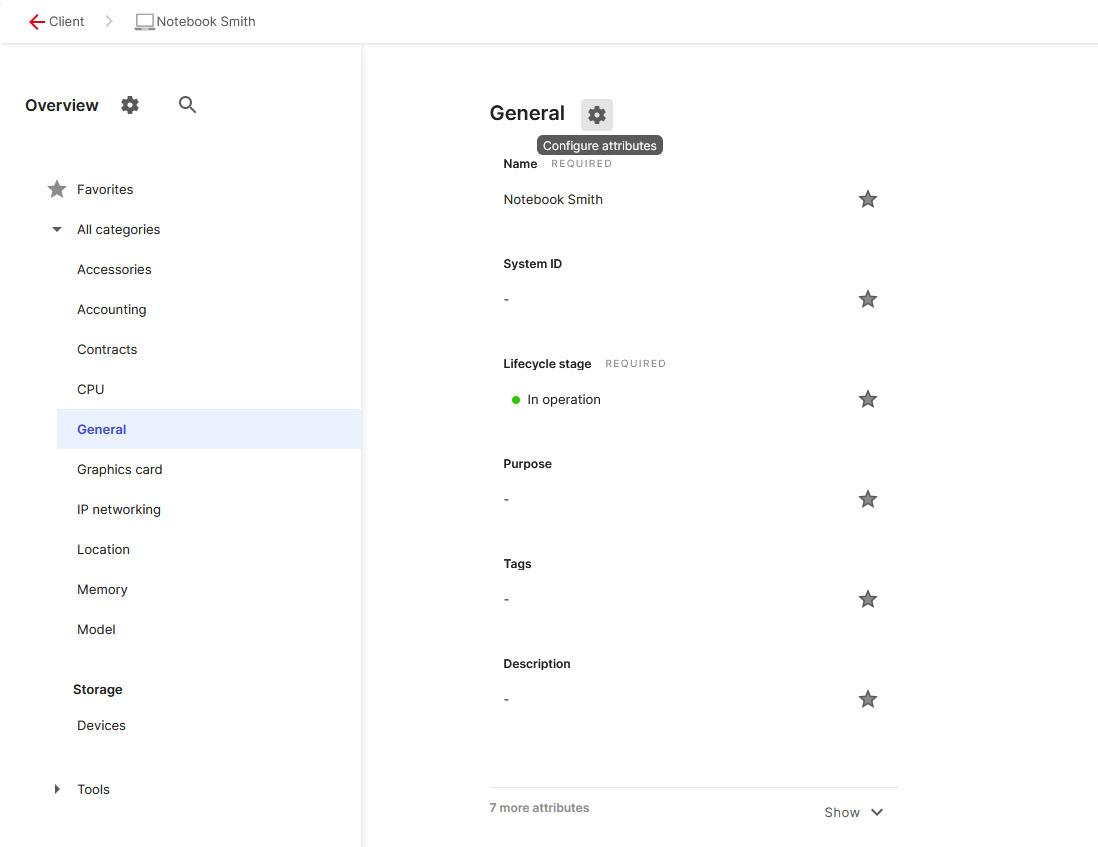
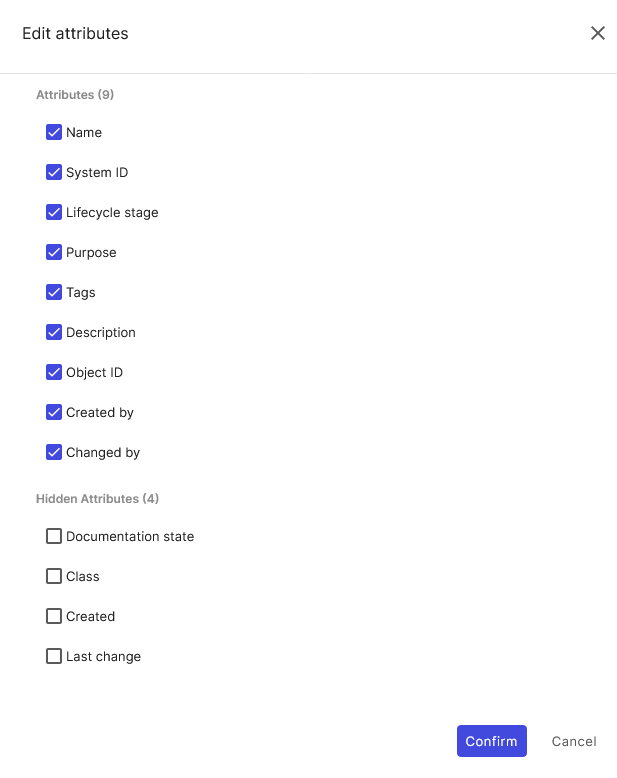
By activating or deactivating the respective attributes, they are shown or hidden in the overview. In this example we have activated the attributes for Object-ID, Created by and Changed by.
Info
Object ID: Automatically generated ID that is assigned once and used to identify an object. Created by: Shows the name of the user who created the object. Changed by: Shows the name of the user who last changed the object.
As a name, we now assign an appropriate designation for the notebook. In this example, we name the device "Notebook Smith".
As a system ID, we can now assign our own identification number (if available).
If necessary, a purpose can be defined in the attribute field "Purpose". To do this, we double-click on the field and create a new purpose via the list icon.

All objects can be tagged in order to group them additionally and to be able to evaluate them specifically.
Documentation of general information#
In the left navigation, additional information can be selected from the enabled categories for the respective class.
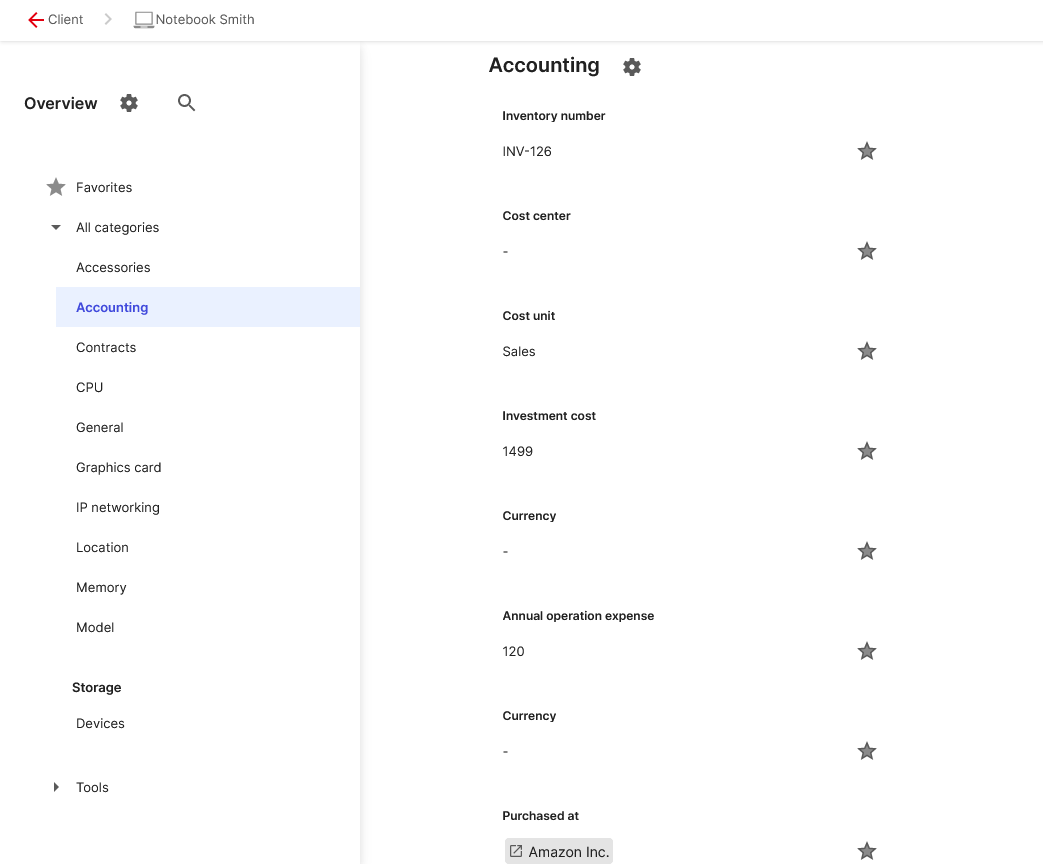
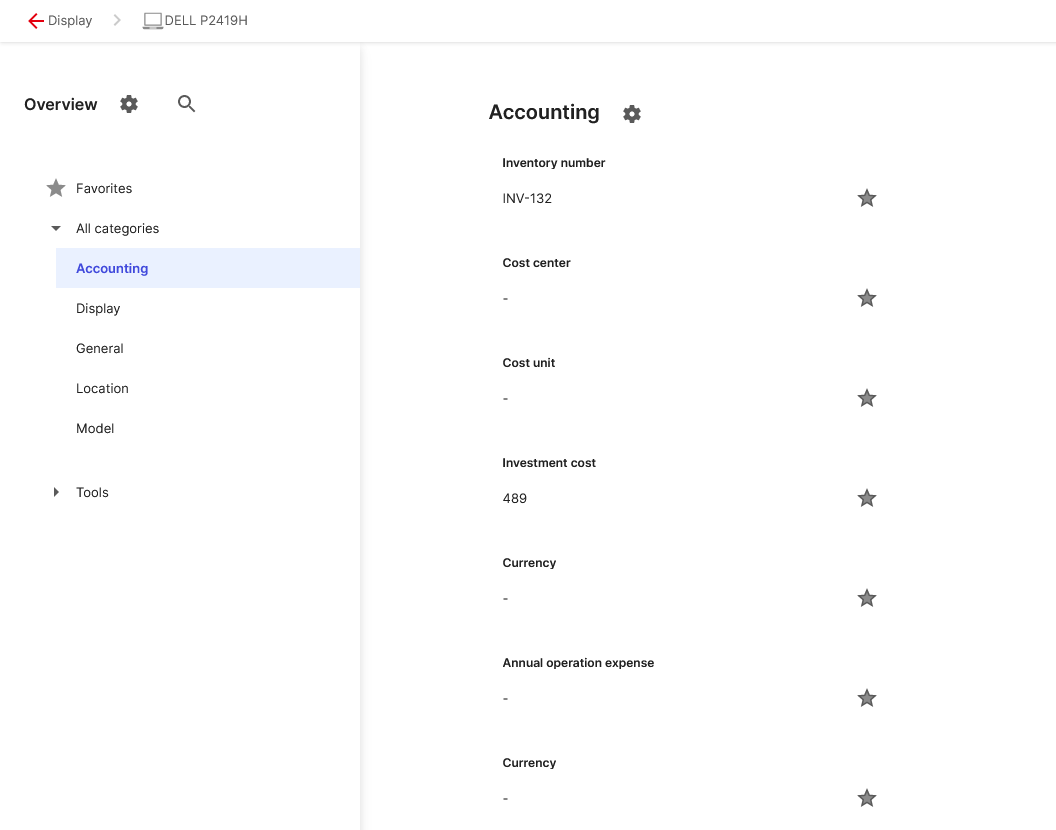
In the category Accounting, financial information about the device can be entered. Here, among other things, the inventory number, the cost center, the cost unit, the investment costs, the operating costs and the purchase are documented.
Other interesting categories for capturing client information include the following:

Warranty: The Warranty category can be used to record warranty claims and times.
Invoices: Invoices for the device can be entered in the Invoices category.
Documentation of technical information#
In addition to general information, technical information is also necessary for documentation, especially for devices and systems. For our created notebook, we will now record information about the CPU, RAM, hard disk and graphics card.
CPU#
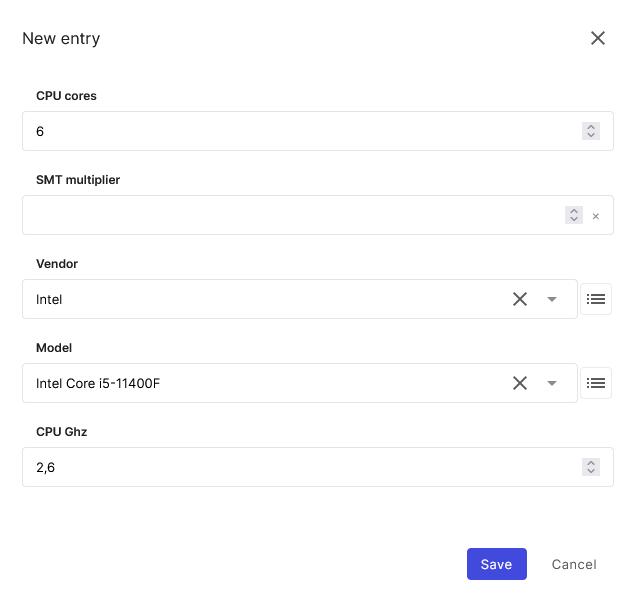
To enter the CPU, we switch to the CPU category in the left navigation. Here, physical CPU's can be added via the button "New Entry".
Besides the manufacturer and model, the CPU frequency, the number of CPU cores and, if required, the SMT multiplier can also be documented here.
Memory#
In the Memory category, the size and type of the RAM, the slot used, and the manufacturer and model can be documented.
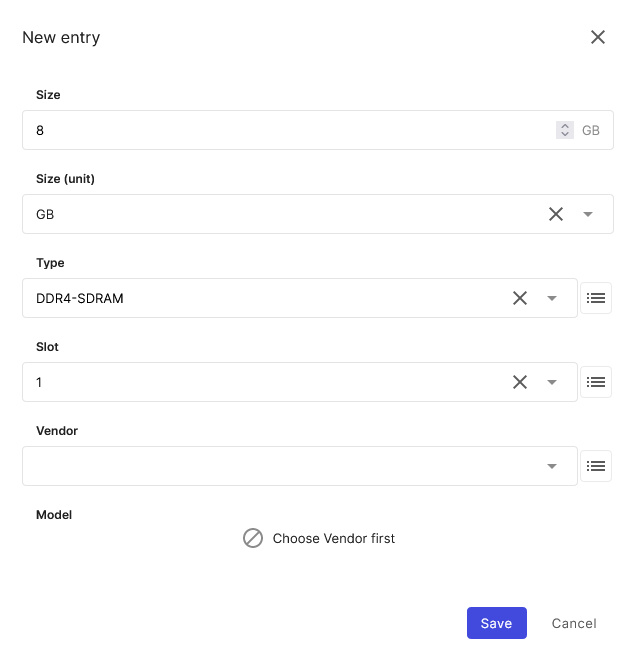
A separate slot should be specified for each installed module.
Document periphery#
Exactly as we added the client to the Workplace, we can add a monitor in the "Display" class. Again, we select the created Workplace as the location and enter all the necessary information in the Display category.
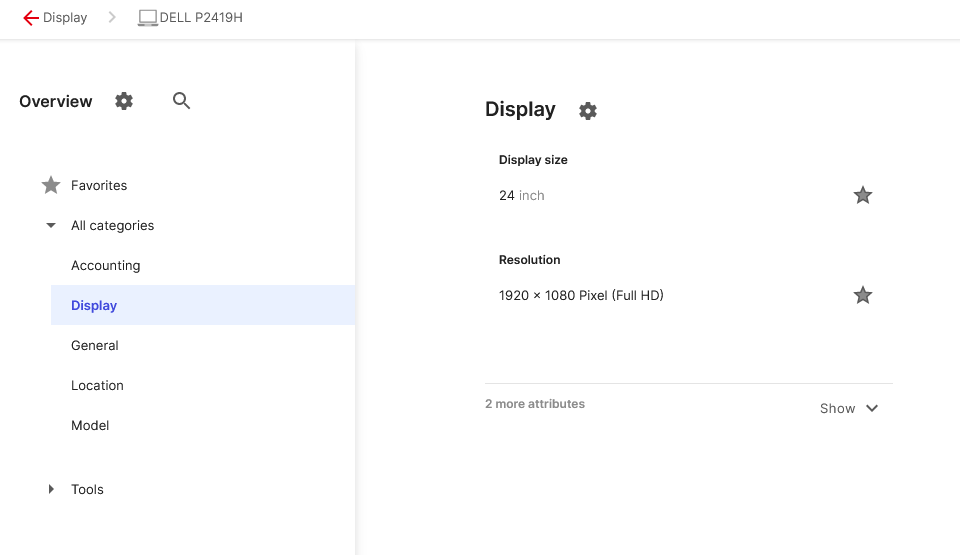
Please also fill in the Accounting category, we will evaluate this information later.
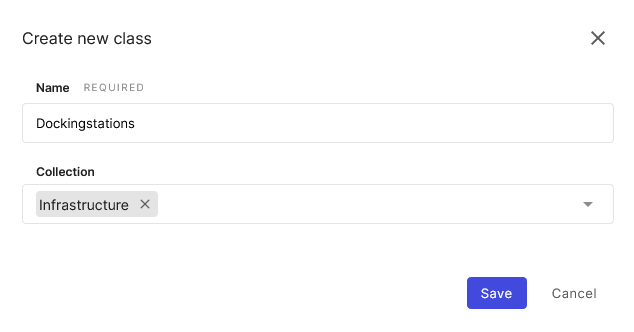
Create new class for docking stations#
For your documentation, you may want to create your own classes to document specific devices or systems. In this example, we will create our own class for docking stations and add a device of this class to our workstation.
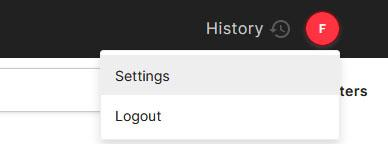
We switch to the settings via the upper right navigation.
Here we see in the left navigation the menu item CMDB Configuration -> Classes. In the next step we create a new class via the button "New Class" for docking stations. We now select "Infrastructure" as the collection. We can always change the collection at a later time. More about this later.
For docking stations, the investment costs are to be recorded and a fixed location is to be assigned. To do this, we now activate the categories "Location" and "Accounting" via the "Add category" button.
If necessary, we can now select a separate icon for the display in the class overview.
We can leave the item "Location Class" on Disable. This option must only be activated if we want the class to be used as a location for other objects. Examples for this would be floors, cabinets, workshops or similar.

Now we switch back to the CMDB Finder and call up the Collection Infrastructure. Here we find our new docking station class and can create a new device.
Here we can now enter the investment costs and link George Smith's workstation via the Location category.
Let's now take a look at George Smith's workstation. To do this, we switch back to the Workplace class and open it.
We can now see three linked objects in the category "Location(linked objects)". Our created notebook, the corresponding display and the docking station.